Edit... A TOUCH KEYER CIRCUIT IS ADDED TO THE END OF THIS PAGE.
Quite a few operators have been talking about how to use a mouse for a key, on cwcom. the obvious way is to check the "mouse" as a selection for "morse input" and then select Iambic on the Morse Key part of the "Morse Key" tab, on the "configuration window"..
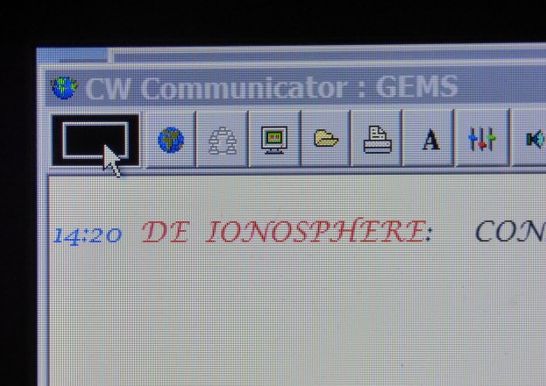
This works, to a point.. but you MUST keep the mouse cursor in the little black box in the top left of the main screen... tricky, ! !..
. it keeps moving about when you key... so, a quick and simple solution to that, is to have the mouse you are using as an adapter, with the key wired to it, secured to the desktop with either Blu-Tack, or tape, or double sided tape...... this should prevent any keying movement being transferred along the cable to the mouse.
The second mouse plugged into another usb port, will be the "normal" mouse that you use for navigating, and also re-locating the cursor in the black square, if it moves out of place. Make sure that the "normal mouse" is located somewhere out of range, so that it does not move during transmission... !.
.......again, it works................ ( but read on for how to make a mouse adapter )
(the adapted mouse will also work with Iambic/Paddle keys... but you may
need to swap your mouse buttons ( on the control panel > mouse ) to
"left handed use"...
an interesting tip.....
For TOUCH SCREEN / TABLET USERS...
(Scroll down the page).....
................. however, what if you are not so good with a "paddle/iambic" type of keying?
can you connect a straight key to the computer in the same way?
The answer is YES!.. you can...
You will still need two "mouses" or mice !.. one to be the "operational mouse" as for normal usage, call this mouse number 1... and the second mouse, mouse number 2, to be "hacked" so that it can be used for keying on a straight key.
ok... how to.... Make a Mouse Adapter
.....How to make the mouse number 2 into a USB keying device for a straight key. ... first remove the little PCB
inside the mouse, and you will see a small pcb,... remove this,.. and have a look at it...
Turn it over,.... and with some blutack, (or you could use some tape )... secure it to the bench , for ease of soldering your wires..... ... ..
I used a roll of insulating tape , blobs of blutack ...
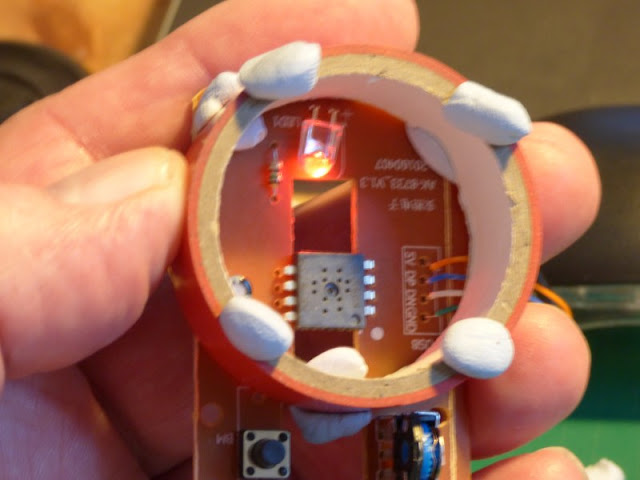
From my pic, at the bottom end you can see two pairs of solder points... these are the contacts of the right and left buttons on the mouse... this gives us some nice convenient points, on the circuit board beneath each button.... to solder a pair of wires to one pair of points...

EDIT EDIT... instead of soldering the wires permanently to your morse key, you could make a short connection to an in-line stereo socket, ( a Rat`s Tail connection )
and then just plug your morse key into that,... this will also give you the opportunity, to use the mouse as a mouse, if you needed to.. and also allows different keys to be connected via the mouse adapter...
You need to determine your wiring, and connection points...
Using a spare 3.5 mm (or whatever size you have on your key) jack, determine by "continuity test" using a meter or battery & bulb, which parts of the jack connect to which solder point .
... insert the jack into the "line socket"... and by a similar process, you can determine the layout of the solder points on the line socket.
do a drawing, and write down your findings... you will probably need to refer to this quite often ! ! ..
Using a suitable short length of 3 core wire ( if it has four, cut one off short ! ).. and solder them to the points on the socket....
Solder the other end to the mouse pcb.... remember to put the sleeve on the line jack first ! !! ..
You will need to make sure that there is plenty of room on the shell of the mouse for two sets of wires to exit... so use a sharp craft knife, or penknife to enlarge both halves of the casing...
before final re-assembly, it is advisable to double check that it is all working fine.... plug in your mouse number 2... ( this one )....
check that you have selected IAMBIC on the configuration window,.. and also double check, that you have "Mouse" selected.
You should also put a "black spot" in the "Reset Method" on the Internal keying box.... ( it may be set as Looping Method already )...
and choose "Iambic" on the "Morse Key" box .
click on the "Transmit" tab, and adjust the speed to about 15 wpm.....
also make sure the "Lock" is not checked.. ( It should be "unlocked" when using Iambic keying.... )
and then you can get mouse number 1 into position with the cursor in the little black box, top left of screen... and if you want... you could stick it down with some bluetack, to keep it in position...
Once you have confirmed that your soldering is absolutely brilliant,.. i.e. it works ! !.. then you can put it all together and make a nice neat job of it....
here is a pic of how a straight key could be connected, direct to the mouse pcb.
NOTE !.... If you are using a straight key... then select "Manual" key....and "Reset Method"... then go to the "Transmit Tab"... and adjust the speed slider to about 15wpm.. ( or whatever your estimate is of your speed).... do some transmitting, and when it appears to be ok on screen, then you can "Lock" the speed .......... ( also a good idea to make a note of the settings on some paper , just in case you need to refer back to them )..
and "Hey Presto".. you can key with the mouse number 2... whilst mouse number 1 does its job by staying put in the black box..
WARNING...
I hope that helps you to do the necessary work...
as with all my information, you work on things at your own risk... it works for me...
I hope it works well for you...
******************************************************
MOUSE WITHOUT A COMMON/EARTH POTENTIAL
Mouse with no "common/earth potential" ... ? here is a solution to the problem..
By Kind Permission of Ralf/DM3BL.
( the article below, is translated using IMtranslator from the blogsite
https://shelterseekersactivities.blogspot.com/)
If
you use the CWCOM program - Morse telegraphy via the Internet - and
want to use a paddle button, you may encounter the following problem:
The
'RS232 to USB' generates an overall too high latency to be able to give
reasonably and a USB mouse cannot be easily connected to a paddle. All
my examined USB mice have no common potential for the right and left
mouse button.
The paddle, however,
already. Generally there are three connections 'dit', 'dah' and the root
contact [common or earth ] of both buttons. The attempt to connect
the constellation directly ends with the involuntary death of the USB
mouse.
The aim is to bridge both contacts of the mouse electronics
potential-free. 5 volts are available as supply voltage via USB. A
'bridging' can be done using optocouplers or reed contacts. I decided to
take the last option.
Wiring diagram mouse upgrade
1. Remove all mechanical components and only use the mouse board. Creativity is then required when it comes to accommodation, or
2. An upgrade in the housing of the USB mouse.
I decided on the second variant.
The
housing of the mouse is often adapted to the ergonomic requirements of
the hand, the electronics required only take up a fraction of what is
available in the 'interior'.
Enough space to upgrade the interior.
Two
reed contacts translate the paddle contacts to the mouse buttons. At
the top of the mouse, a small key fit as a straight key and a three-pole
2.5 mm jack socket was installed in the side. With this constellation,
the mouse can still be used as such.
My palm paddle can now be connected to the mouse with an adapter 3.5 mm to 2.5 mm jack.
For use with CWCOM, the input must be set to 'Mouse' and 'Iambic' in the menu,
the mouse pointer must be placed in the small field [black square] at
the top left. [of the main cwcom window] The mouse also works in
parallel with a touchpad or an already connected mouse.
Once you have aligned the mouse pointer, you just have to make sure that it stays there.
{
edit... you can keep the mouse cursor in the black square, using some
"blu-tack" to stick the mouse to the desk top , or other location }
Thank you Ralf, for this useful idea. 73 DE G3MS
********************************************************
HERE IS A
"TOUCH KEYER" CIRCUIT...
PROVIDED BY GRANT/VK2GEL (Thank you Grant)
I have received an interesting email from Grant/VK2GEL in Australia.
He has designed a small PCB to accommodate a few components, and make a
nice little tidy interface for Touch Keyers.
Here is his website page... http://members.westnet.com.au/page3/touch_keyer_interface.htm
Thank you Grant....
*********************************************
For TOUCH SCREEN / TABLET USERS...
September 24 2017 update.....
(Information supplied by Tony/G4FAI ... Thank you Tony, for your input, and support )..
I use a Linx 8 tablet and have found that briefly touching the black square with a finger or a stylus has the same effect as if the cursor was placed on the box permanently.
It would be interesting to hear from the users of other tablets if they have the same experience.
If anyone has any other useful ideas..... please email me... and I will see if they are appropriate to add to this page. (or a new page ! ).


