Wednesday 24 August 2016

CWCOM - No Connection to Server, and Sound Problems ?

 No morse code sound when typing.???

No problem... that is normal ! ...


No Connection to Server ,?  ........


.....after clicking "Connect" button on the Blue World Icon...


Scroll down this page for help notes on the above problem.


Another sound problem.... 

     The TONE of the morse is very HIGH on the default setting  ( click on the speaker Icon ).. of 1000

Set the tones as follows....  
TX Tone....  858   

RX Tone....  815,  

And you may find that these tones are more acceptable.... the lower tone on RX Tone setting, will probably also stop some stations " Chirping "  or " Clipping " on the dits and dahs. 


*************************************************************************************


  Windows 10 - clipping 

on the Audio of received and sending. 


To resolve the problem, follow these instructions ( kindly supplied by Richard / MW0GWG

 ************************************************************************************


The audio clipping I was getting while using Windows 10 was resolved by going into the sound card settings as follows

Right clicking sound icon in taskbar
 
Click open sound settings
 
click sound control panel (top right)
 
double click the speakers that are in use
 
click advanced
 
uncheck - allow applications to take exclusive control of this device
 
uncheck - give exclusive mode applications priority

RESTART THE COMPUTER.....

When I restarted the PC those were re-checked by windows but the problem had gone


 *************************************************************************************


If using Windows 10, and have "keying" and "sound delay" problem....  

Make sure the "Internal Keying" choice is selected to "Reset Method". 


 ..... see also the page about "keying with a mouse"...  (this gives instructions on how to adapt a second mouse to use as an adapter instead of the USB to Serial converter ).


 Weird sound problem....

I recently had a problem with my small 10" laptop, that I take on hols, and work cwcom/p  or out in the garden on a nice day... The problem manifested itself as a "sound" type problem, but was also associated with incorrect display of the keying.   I use several straight keys,.. so, at first, I suspected the key I was using had dirty contact... changed the key for another one... still same problem... apart from the "crackling" sound... and the "weird" tone/effect that came out of the speakers, there was also some delay in the sound, and the letters on the screen.. All rather "off putting" and frustrating.  The keying was totally corrupted. and the next thing I decided "may" be at fault was the PL2303 usb to serial adapter cable... so I changed it from the cheap chinese version, to the "proper" PLUGABLE one... still not fixed..  Tried several keys, and then double checked it against my "home/desktop" laptop which was producing the same "errors on screen" as the 10" laptop... so I tried a reverse keying... i.e. keying from the home laptop to the 10" ... no problem... Weird or what..

At this point, it was probably caused by Windows Downloading and installing Updates. onto the 10" laptop... ,. 

 however,  I was not thinking about that, and did the following...  


Decided that it was, after all, something to do with the sound card, or sound drivers,

 I went to the Help part of CWCOM.. accessed by clicking on the ? at the top of the screen,.

file:///C:/Program%20Files%20%28x86%29/MRX%20Software/CWCom/Help.htm#Audio
.. here it suggests some different ways to combat problems with CWCOM sound... however, none of them worked.

Out of the blue !... Yup.!  I got one of those "eureka" moments...  I suddenly remembered, that last year, I bought one of these critters......


Blue Tooth Dongle 


Just to see what it was, and how I could use it, if my blue tooth failed...  I did actually plug it in, to both my laptops, and so the device automatically loaded up the drivers for it....

 And so I thought... let`s go and check to see if that "may" be causing problems,  so I clicked on  START then Control Panel> Device Manager


Then found the list of devices

Device List


Look down the list for "NETWORK ADAPTERS......


Noticed the two Bluetooth devices listed..... and decided to investigate further...  right click on the first one...

And you get a "pop out" message box....  so I clicked on "Disable"  for that... the list then disappeared and reappeared,... so I did the same again on the second Bluetooth Deivce...

You get another pop out warning that disabling it will stop it working.....  ( Surprise! surprise !)..

Having disabled those critters... Move further down, and click on the "Sound" listing... 


And look!... another Bluetooth mention...  so Disable that one also.. as before..

After doing all that... I thought I had better check that the "proper" bluetooth connections had remained to my other blue tooth devices... so I went to the Bluetooth Icon, bottom right of screen, and clicked it...

Now click on "Show Bluetooth Devices" and you should get a new window pane open with all your bluetooth devices listed...

After doing all that.... I went back to CWCOM, and did a test transmission, and it was perfect... the sound was "much improved"... and the text appeared on screen exactly as I had keyed it...


NOTE... THIS WORKED FOR ME... YOU USE THE INFORMATION ON THIS BLOGSITE AT YOUR OWN RISK...  IF YOU HAVE BLUETOOTH DEVICES , LIKE BLUE TOOTH HEADPHONES, BE SURE TO DOUBLE CHECK THAT THEY ARE ACTUALLY WORKING.. AND IF NOT... RE-ENABLE THE DEVICE IN THE SAME ORDER AS ABOVE..

ANOTHER NOTE...  Using a bluetooth phone connection instead of a wireless connection .. ( to tether your phone to your laptop), may cause delay in keying.

Similarly..... CWCOM does not work whe trying to runit on a Virtualbox. ( like Main o.s. is linux but Windows is on Virtualbox.... Instead follow instructions on how to install WINE on Linux and MAC to use CWCOM 

 *****************************************************************************************************


No Connection to Server , after clicking "Connect" button on the Blue World Icon...


   It has been noted, that very occasionally, CWCOM fails to show DE IONOSPHRE:    CONNECTED!  


 after clicking on the "Connect" Button on the blue world icon drop down menu. 


In most cases, this could be caused by the "interface"  (*PL2303 usb to serial adapter,)  between the Morse key and the computer/laptop not being properly inserted in the USB slot, or the DB9 plug/socket not pushed together properly, leaving an "open circuit".

First choice is to shut down cwcom,...check that all plugs have been properly inserted into their respective socket, and then re-start cwcom.

Click the blue world icon and then "Connect"... it should then show the DE IONOSPHERE:    CONNECTED! on the main screen.


Another cause may be the wrong pins have been soldered during the making of the adapter DB9 connector.

Double check that the correct pin numbers have been wired and soldered correctly, and that they marry up with the same numbers in the socket.


A less obvious cause may be due to   the following.

Typically, a network adapter driver will be marked on status as "disconnected", when there's no cable plugged in or when there is no wifi connection.

The pesky problem is that there are virtual network adapters, some come from applications like VMWare Player, Virtual PC, and VPN software.

Those virtual drivers have a virtual IP address and make it appear to other programs that they're a functioning network adapter with a virtual ip address, which they are not.

 The one big giveaway is if you click on the "Connect" button, with CWCOM and you dont see this


or the green icon on the status lit up like this


If you have a virtual adapter enabled with its virtual network address, when you try to connect it will look like this after clicking 'Connect'


In order to fix this you must disable all virtual network adapters, and leave only the Ethernet or the Wifi Adapter enabled in control panel of windows, here's a screenshot of some virtual adapters that are enabled and give CWCom a false IP address and no internet connectivity

First open Control Panel on windows and click View By Large Icons (on the right side)


Then click Network and sharing center


Then click Change adapter settings


Then find the virtual network adapters (they are the adapters that are not your Wifi adapter and not your Ethernet adapter)


you want to right click each virtual network adapter and click Disable


Then it might look like this


Then try connecting on CWCom


Thanks to K2COW Mikhail ( Mike ) for the Virtual Adapter information.


Saturday 20 August 2016

Straight Morse Key - settings and adjustments and cleaning the contact point.

I have been asked, several times, to write a piece about how I set up my straight keys... and so here it is...

 A straight key, is a basic, ON / OFF switching device. used to transmit Morse Code using a Landline, or a Radio Transmitter, or a flashing light. 

 The principle behind the code is the length of the dashes and dots, and the relationship between the two ( long and short) period of time that the key is actually in the ON position.  A Dash, or "dah" is equivalent to 3 Dots, or "Dit" or "Di "as in the famous letter V used for testing the key... "Di Di Di Dah"... The space between letters in one word is equivalent to one dot... and the space between words is equivalent to one dash..

To send morse properly, requires some skill, and understanding of that relationship,  the more you use the Morse Key, the easier and more "fluent" the operator becomes, which increases his speed of sending. 

   However, it must be appreciated, that it is no good sending fast morse, if the guy at the other end, cannot receive it correctly , or understand it correctly, and at a speed that he is comfortable with receiving it....

 
.               ... also it is no good sending fast morse, and making lots of  mistakes,

.. this, in effect, slows down the actual words per minute count, due to error correction.

     Therefore, it is preferable to make good morse slowly and accurately...

   or , as I was told by my instructors in the Royal Navy... "Accuracy is more important than speed"... 

      That was true in 1960 and is still true today.

With that in mind, it should be obvious that the settings of the key should be understood, and so, I shall try to explain what to do, and what each function does, and how it will affect the morse being sent on that key.

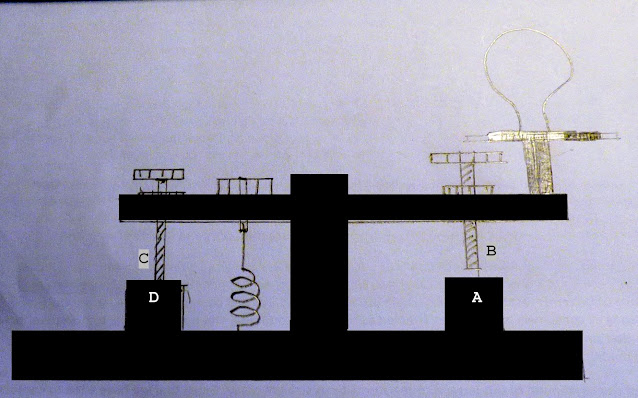
Here is a drawing of a straight key...  not all straight keys look like this, and indeed, some have different arrangements for the spring tension, and pivot point, but the basic information about the settings will become obvious, when compared to the key you are trying to set up, according to these instructions...


To make a start.... have a look at your key... and make sure that the rocker arm is roughly parallel to the base, or horizontal,... as in the drawing.   

Have a look at the contact points, by holding the key up to eye level, and against a light or window, you should be able to see how the surfaces of the contacts "mate" when the key is closed...

       If the rocker arm is tilted forward or backwards,.... only one edge of the Rocker Contact, will make contact with part of the base contact.... then the contact points will not close properly on a level surface, and cause key chirp, or incorrect, unwanted contact, so that is why it is important to start with the rocker arm "horizontal" as in the picture


Cleaning the contact point....


NEARLY ALL 2ND HAND STRAIGHT KEYS WILL HAVE BEEN ABUSED BY PREVIOUS USERS OVER THE YEARS... SO IT IS ESSENTIAL TO TRY TO REPAIR OR RESTORE YOUR "NEW" ( 2nd hand ) KEY .


  if your key is in "reasonable" condition, as outlined above, with the rocker arm level/horizontal, and the contact points in line...

The next thing to consider is cleaning and setting the actual (front)  (some keys have it at the rear)..contact points...   

Here you need to use some fine wet and dry paper, in a strip, to make the contact points clean. by just holding down the key and tightening the gap adjuster ( front or rear , depending on your key ). so that one thickness of the wet and dry paper is "just" gripped... draw the paper across the points and repeat about 3 or 4  times. ... , then turn the paper over, and do the same again...

This "should" make the contact surfaces "level" when the key is closed.... ... Check it against the light , as before, and continue until they are "true" 


After using the wet and dry paper... use a strip of ordinary white printing paper ( not glossy mag, or photo paper ), and draw that through the contact three or four times, to remove any surface grit or dust, which could cause unwanted contact.... 


BUT...if the rocker contact point and the base contact point are not "truly squared up".. this can cause keying problems.. so it is best to ascertain that the base contact point ( front and rear stop).. are "true" in the engineering sense of the word... 


 To do the work to "face up" the anvil (base) contact point, it will probably be necessary to take the key apart, being careful to lay out the parts and make notes of any special way it was put together....

Basically... the "anvil" point  (A) ... i.e. the one that is on the "base"... needs to be perfectly "faced up"..  so that the contact surface is "flat" and parallel in all directions across its surface...  

     On a straight key, it is possible to do this with a file, using some washers that act as the "working surface level".. i.e. put enough washers over it until just the "face" surface is just "proud"... then you can run a smooth file across until the surface is level... the washers act as a "stop" and a guide, to make sure the file is kept "level" to the base surface. 


     Once you have got the "anvil" point (A)  re-surfaced, it is easy to do the "hammer point"..  (B) . Using a strip of medium wet and dry paper. Read on !....

Re-assemble the key... with the rocker arm, springs and adjusters (contact) in place. 

 Set the rocker arm horizontal, and set the contact gap. 

 If the contacts are "fixed" and the gap is adjusted by a variable adjuster, and the gap between the contacts is too large for the rocker to be horizontal... then some "correction work" will be needed to make the contacts closer together... this may involve replacing the fixed contact on the rocker, or adding in some small washers, or alternatively raising the "anvil" (base) contact with some washers beneath it.

Once you have the remedial work done, and the rocker arm is horizontal again... you can "face up" the rocker ( hammer ) contact as follows...

using a strip  of medium wet and dry...  with the backing on the underside, i.e. rubbing against the surface of the anvil (base) contact while pressing the key down on to the wet and dry...

 draw the paper through, several times, until you get both surfaces to meet "face to face".. keep checking this by holding the key up against the light so you can see the "profile" of the contact surfaces....  check that the surfaces are "parallel" across the surfaces  side to side  and front to back.  

  if not... do some more work with the wet and dry.......  !.. it is well worth the effort to get this correct....

     After doing the filing and wet and dry... use a strip of "normal" white paper, to draw between the two points to clear away and working dust/filings...


       then adjust the gap according to your preference....  


    The rear "stop"   (D) and "gap adjuster" (C)  also needs to have the same treatment... otherwise the key will not "sit" properly at rest, between symbols, and that will cause some spurious dits, in just the same way as if the "anvil" and "hammer" are not "faced up"... 


      It may be a bit more difficult for a paddle key to be re-faced... but it is , none the less, just as relevant for the contacts to be clean, "mated" and "faced up"...to ensure good contact, especially if sending at high speed....


Doing the initial setting adjustments.

Once you have done the initial clean,...

slacken off all adjustments.... 

If your key has pivot points with a screw thread on the side ( as shown in the picture),... then you need to slacken them off too..

            Your key may not have side screw adjusters,.. but you still need to make sure that the rocker is free to move up and down...

          Use a drop of  light oil, or sewing machine oil, on all friction parts, where the pivot is making contact with the upright supports, to reduce operating friction.  

Test the rocker for fast reaction by tapping the key , and watching how quickly it returns to the horizontal "rest" position.

          If there is wear on your rocker pivots, you will probably have problems sending, even though you adjust the rest of the key properly, so you may want to consider how you can refurbish the worn rocker pivots, or replace the key with one that has no wear, or sideways  (horizontal) movement on the pivot point. 

 (Check it by holding the key steady and trying to move the knob from left to right.... )

Set the front and rear contacts (A & D )  to make the rocker arm horizontal again... 

    then tighten up the side adjustable pivot points until they "just" grip the rocker,

 making sure they have enough "grip" to prevent a sideways ( left to right ) movement of the rocker arm...but leaving a "free" movement up and down..   

 Any sideways movement here,(caused by wear and tear ) can alter the gap on the front contact by a hairs breadth, and cause incorrect keying. ..

           This adjustment is important.... and although it needs to hold the rocker arm steady, it must also allow "free movement" up and down on the rocker arm... 

If it is too tight, you will need to have more spring pressure or spring tension to return the rocker to the "off" position quickly enough for the key to work properly.

     Too tight, and it will also tire out your wrist action, and make keying uncomfortable or hard work,  after a short time. 

      Too slack, and it will move from side to side, as mentioned previously.

        To check the "free movement"... (up and down)

   slacken off the Gap adjuster ( front or rear depending on  your key)... so that it has a LARGE gap... and just test the movement of the rocker by quickly tapping the knob and watching to see how quickly it returns  ( you may need to add some spring pressure/tension, but don`t overdo it... "Just Enough" is the motto ... )


   A word about the springs on a straight key.....


Front springs, are usually PRESSURE  or COMPRESSION springs.. where you have to screw down  to adjust how much pressure is needed in the spring below, to force the key "off" and back to rest position.

Rear springs are usually TENSION springs, where you screw an adjuster "out" or "up" to increase the PULL DOWN on the rear half of the rocker arm, to pull the key "off" to the rest position.

      The amount of Tension or Pressure, that you have set on your key, will decide on how quickly the key returns to the "off" position, and also will decide the speed at which you can send...

      If you have a "strong" spring pressure or tension, it will bring the key off quicker, BUT, it will also slow down your sending, because you need more pressure in your wrist action to make the key "on"... and that will make your wrist tired quicker, and make more mistakes...

 and so, it is a "fine" line to adjust the spring properly for your sending style.

Setting the Gap.....

     The next thing to do is to set the gap.... Tear off a strip of paper from a normal A4 paper as used for printing out letters, etc...about 20 mm wide will suffice... and place it in the front contact gap, and then adjust the gap with the rear gap adjuster ( or front, if no rear one on your key ).. until it "just" nips the paper.... remove the paper and check the "free vertical movement" by tapping the key... checking to see how quickly it responds and returns to the "off" horizontal position.


  Spring adjustment...

            now is the time for you to adjust the spring tension, or spring pressure, 

 depending on which type B or type E you have on your key... ...  You can also adjust the gap to a smaller amount, to reduce noise, and to increase the speed you can send at. 

         Practice sending some words ( not connected to your transmitter).. to see how the key "feels"...  and adjust the spring tension/pressure and gap,  according to your way of sending.

 And that`s about it..  ... from this "initial setup" you should be able to make "fine adjustments" of the gap and tension/pressure, to suit your style of sending...

Once you have adjusted the spring tension/pressure, and set the gap, even small adjustments on the size of the gap, can alter the timing of your sending symbols, and subsequently, the speed that you can send at...

       As a really bad example of this.... If you set your gap at ( say ) 5 mm  and you sent some symbols, it would be ( say ) 10 wpm maximum because of the actual distance the rocker ( and contact closing time ) arm has to travel...
.
            now if you reduced the gap to ( say ) 2.5mm... and sent the same symbols it would ( probably) increase the maximum speed to ( say ) 15 wpm.... and so on...
                the smaller the gap, the less time the rocker takes to close and open during your sending of symbols, and consequently, the smaller the gap, the quicker you are able to send...

   This does not mean, that by setting the gap very fine, you WILL send faster, because, of course, it depends on your skill and training levels. You can still send slowly with a small gap though ! ! !... 


You can practice sending, using this, and other "standard" test phrases...

BROWN BREAD TASTES BEST WITH BUTTER AND STRAWBERRY JAM 

THE QUICK BROWN FOX JUMPS OVER THE LAZY DOGS BACK

NOW IS THE TIME FOR ALL GOOD MEN TO COME TO THEIR MORSE KEYS 

this one is a really good test .....!

OF ALL THE FISHES IN THE SEA THE MERMAID IS THE ONE FOR ME 
 

Whilst "practicing" you should be trying to analyse what "feels" right... and what "feels" wrong with the key......

Remember... Accuracy is more important than speed..... and try not to send faster than the other guy can receive accurately.... !

I hope it has helped you to set, and get the best, of your straight key

The video below, shows me using an Admiralty Pattern 7681 Straight key, adjusted according to the instructions above.... as you can see, I do not use the key in a conventional "Hold"  I just tap on the spark guard.... I got my knuckles rapped with a ruler, quite a lot, when I was in training,... but eventually, the instructors decided I could send better "my" way... than the "official" way ! ! !

 You can view the video on FULL SCREEN by clicking the square in the bottom corner.... Put your phones on,.... or turn up the volume...


I do not have a ham licence, but you can find me on CWCOM, using my keys ( as featured in my other  blog    http://nemosphotography.blogspot.co.uk/       ) contacting people around the world, using the ancient, morse code, over the modern internet...  
 CWCOM is free to use and download from  


https://archive.org/details/cwcom
 
( see page 1 of this blog for details ) . 

Hope to see you there, my call is G3MS       73  VA dit dit

Sunday 14 August 2016

Notes for WINDOWS 8 and 10 and 11 users - also how to use "Compatibility Mode"

Windows 8, 8.1, and Windows 10  & WINDOWS 11 users..

IMPORTANT INFORMATION FOR WINDOWS 11 USERS
  

1ST JULY 2024. 

It has come to my notice, that certain people are having trouble gaining the COM Port in the Morse key tab. This is due to incompatiblity with "old" PL2303 usb to serial converters. so I put the following question to Google

Is PL2303 compatible with Windows 11?
 
And this is the answer I found.
 
Windows 11 and higher are NOT supported in PL-2303HXA/ TA/TB/HXD/RA/SA/EA (EOL chip version)
 
Run PL2303 CheckChipVersion tool program in Windows XP/Vista/7 to check chip version. 
 
Windows Vista, XP, 2000, 98 and Windows ME driver technical support are discontinued. 
 
 Prolific recommends to use PL-2303GC chip.5 Jan 2024
 
At this time, the only place I could find to buy a PL-2303GC usb to serial converter, with DB9 socket, is on AliExpress

You might need to uninstall the current driver, and re-install it, when you have the new PL-2303GC cable connected to your computer/laptop, for it to be recognised. 


New Edit  17 April 2017

Some users have reported problems with the keying using Windows 10, and external key, including Paddle key, using the USB to Serial Converter, or even on the serial port of a Desktop or Tower system.

To resolve this issue, there is a "workaround"... please visit PAGE 7 of this blog,  "Keying with  a mouse adapter" for keying on Windows 10


Using the USB to Serial Converter.

According to the PLUGABLE site... you should have the correct driver downloaded, as soon as you plug in your PROLIFIC PL2303 USB TO SERIAL CONVERTER....

....   however, if you still want to get the driver.... visit this site...  BUT READ ON FURTHER DOWN.... BEFORE DOWNLOADING DRIVER...

 http://plugable.com/drivers/prolific  


IMPORTANT.....

If you are using other manufacturers usb to serial converter, then you need to check with PL2303 CHECKCHIP TOOL....  to make sure that your item has the correct chip inside... otherwise it may not work properly.


NOTE: -
Windows 8,   8.1,   and Windows 10  are NOT supported in the PL2303HXA    AND   PL2303X EOL chip versions. 


The latest chip version that IS supported is PL-2303HXD  (version HX revision D


or  PL2303GTA chip.


PL2303 CHECKCHIP TOOL  http://www.prolific.com.tw/US/ShowProduct.aspx?p_id=225&pcid=41http://www.prolific.com.tw/US/ShowProduct.aspx?p_id=225&pcid=41


 From the Plugable page.... this warning....


Warning Notice:
Please be warned that counterfeit (fake)
PL-2303HX (Chip Rev A) USB to Serial Controller ICs using Prolific's trademark logo, brandname, and device drivers, were being sold in the China market. Counterfeit IC products show exactly the same outside chip markings but generally are of poor quality and causes Windows driver compatibility issues (Yellow Mark Error Code 10 in Device Manager). We issue this warning to all our customers and consumers to avoid confusion and false purchase.


If you are having problems getting CWCOM to work, then..... use the PL2303 chip check as above... to make sure your chip is the HXD version... not the HXA version....


  COMPATIBILITY MODE


You can also Try "compatibility mode".....  to do this...


START  > type in  CWCOM in the box above Start.... 

 or find the cwcom. exe file in your cwcom folder.

  Right click on the CWCOM icon, and find " Open File Location"... in the drop down menu.

 Left click on that...  Then Right click on the  CWCOM icon again.. 


click on Properties,

. to find "Compatibility" tab...  ..   Then  check the box at "run this program in compatibility mode for....."   


click on the arrow to get the drop down list....
of previous Windows O.S.  and I suggest you use Windows 7 or Windows Vista as compatible modes.... and I hope that works for you....  Good Luck... ).


CWCOM - CONNECTING A MORSE KEY

This section covers how to connect a key, and what settings to use to get it working on cwcom .

EDIT .. ( 27 MAY 2019 )   A TOUCH KEYER CIRCUIT HAS BEEN ADDED TO THE END OF THIS PAGE.... 


Windows 10 users.... check out the Page 7.. Keying with a mouse ..... for an alternative way to connect your key... especially if you use paddle/iambic key or experience keying delays on sound and text. 


If You use your key on a HF transceiver, it will probably have a line jack plug on it..... so you need to wire a Line Jack Socket ( stereo type) phone connector to the DB9 socket.... as shown below.   

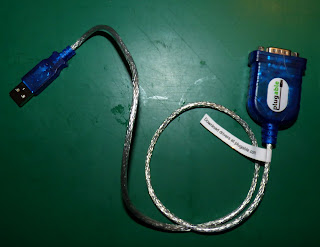
If you use a Laptop as your main computer,.... you will need a USB to Serial Converter (as in pic below).  A DB9 socket, and an "In - Line Stereo Phones jack socket" 

Or ,....you can make up a "mouse adapter"  see page 7 "Keying with a mouse".... of this blog for detailed instructions.


You can purchase a USB to Serial Converter  (PL2303) on ebay, Amazon, or direct from Prolific, in the USA...  however... 

 Windows 8    Windows 8.1  and Windows 10 users should be aware of this warning.....

 NOTE:

    Windows 8/8.1/10 are NOT supported in PL-2303
HXA and PL-2303X EOL chip versions.

 
    Run PL2303 CheckChipVersion tool program in Windows XP/Vista/7 to check chip version.


    Windows Vista, XP, 2000, 98 and Windows ME driver technical support are discontinued.


    Prolific recommends to use 

PL-2303HXD (HX Rev D) or PL2303TA chip.


PL2303 USB to Serial Converter "should" be Plug and Play... your computer should automatically find the driver for it.  


"Plugable" USB to Serial Converter lead
 Most keys have a 3.5 or 1/4" jack already
 wired, and so,you will need to make a 
"rats tail" connector, rather than re-wire
your key to use on cwcom. 
 
 
 You will need ..... 
 a DB9 socket and...
 a Stereo in-line jack socket....
 and a short piece of 3 core cable, 
as used on `phones


It is important that you get the pin numbers correct, and you should be able to see them on the “face” of the DB9 socket.  


Although you may need a magnifying glass ! !


        It is also important to make sure the line socket connections are the same as the jack plug, otherwise your straight won`t work properly...


You can use an unused jack plug into the line socket to check the continuity of the connections and all the way back to the DB9 socket, with a multimeter, ( or battery and bulb with a length of wire ! ).


 Depending on the key you use, 
depends on the connections to the DB9…. 


Straight keys connect only two connections…( pins 4 & 6 ) ...

 Paddle keys require three….

DB9 – 9 Pin Serial Port Connection
  • Pin 6 - manual key or left paddle
  • Pin 4 - manual key or common
  • Pin 8 - right paddle
  • Pin 7 - Sounder Output (This pin - RTS - goes high with morse input/output)
  • Pin 5 - Sounder Ground


DB25 – 25 Pin Serial Port Connection (straight keys only connect pin 6 & 20 )
  • Pin 6 - manual key or left paddle
  • Pin 20 - manual key or common
  • Pin 5 - right paddle
  • Pin 4 - Sounder Output (This pin - RTS - goes high with morse input/output)
  • Pin 7 - Sounder Ground
  •  

 
Here is an edited photo of my set-up 
to show how all the bits and pieces come together.


********************************************************************************
 
Setting up the computer....


Once you have done the soldering... ( and checked all the way through!).. 
You need to set up the laptop to recognise the USB to Serial converter.
this is normally automatic  on WINDOWS ...
       ( but see Linux and MAC pages for special  instructions on how to
 set the comport nummber) 

when you plug it into the usb port.
It should automatically find the driver and install that too !!
  
Setting up the COMPORT number 
      (Linux and Mac users see your special pages on this blog
 
After plugging in the USB converter, it should be automatically recognised,
however, in the settings on the Configurations window, you need to specify
COMPORT on the Morse Key tab... it may not "recognise" it, so you will
need to find out which comport number is allocated.  
 

 so here is how to do that....
^^^^^^^^^^^^^^^^^^^^^^^^^^^^^^^^^^^^^^^^^^^^^^^^^^^^^^^^^^^^^^^^^^^^ 
 
  Finding the COM port number..... (Windows operating system)
 Plug in the USB/serial adapter

 go to "Start"  > Control Panel > Device Manager > Ports (COM & LPT) 


Expand that ( click on the + sign)... and, hopefully, you will see
your USB /Serial adapter ( mine is listed as Prolific USB-to-Serial
Comport (COM2)  .. you may have a different number assigned, 
but that is the number you will need.. 
Go to the CWOM configuration window click on the Morse Key 
tab  , and set that number in the   COMport window'
Note... Any number above 14 will not work.  So you may need to
reset the COMport number..... as follows...
 
Resetting the COMPORT NUMBER 
 
  as above.... START > Control Panel > Device Manger > Ports ( COM & LPT)

Right click on Prolific USB-to-Serial Comm Port... 

and then click on Properties

 Click on the "Port Settings" tab. 

 then on "Advanced" 
In the window you will have the current COMport number
(it may show "in use" which may be true ... or not ! ! ! ). 
If you want to use COM port 6 just change it, (as below) and 
see if it works  ( it probably will! )    
 
you can change this by using the little down arrow box...

and highlighting another number.... 

I suggest you use number 6 ( or any other number not "In Use" !)

 
 Then EXIT every window by clicking " OK  "
*******************************************************************************


So now your are ready to go….
Call up CWCOM and 
click on the Icon to the right of the 
on top of the screen, this is the "Configurations" window.
You will need to do this every time you start CWCOM. 
You should not need to reset the comport number as it is 
automatically selected. 
Set your Morse Input to COMport
Set your  "Morse Key" to the type of key you are using
i.e Manual = Straight key and use "Reset Method"
    Iambic =   Paddle keys, sideswipers etc (incl. mouse) and 
use "Looping Method" 
Uncheck Dit Memory
 
If your keying produces TTT  T TTT  T TTT TTTTT TTT 
or corrupted letters ( not what you are sending ! ). then you
will need to check your "Transmit" speed ... 
(You can do this on the CONFIG window  ( icon to right of black
letter A at top of screen)  
 Usually this occurs when using the down arrow key.. 
(it needs to be set less than 10wpm ) 
Reset the speed to what you think your normal transmit speed is,
then try again.  You may need to do several test runs of 
"Brown bread tastes best with butter and strawberry jam" until
it shows a good copy.      
Once you have a good copy on screen, then for straight keys 
can put at check mark in the LOCK box.. and write down the 
speed settings for future reference, if you need to reset them.
       

^^^^^^^^^^^^^^^^^^^^^^^^^^^^^^^^^^^^^^^^^^^^^^^^^^^^^^^^^^^^^^^^^^^^^^^^^^^^^^ 
 
 
 (NOTE>..... you do not need to "connect" to the internet
to do practicing....  just click your mouse cursor on the 
screen... your practice will only be heard and seen by you 
 To chat to other users... you will need to connect
 to the internet.
On the top of the screen.. click on the blue world icon
A new window will open showing connection details..
channel 1000 is the default ( calling ) channel, and your
I.P address number will be in the Callsign box window
 If you have a Ham Radio Callsign, you can enter it there,
and it will show whenever you are sending, If you do not 
have a ham call, you can make one up using your initials
or your name.
click "Connect".. and you should see 
DE IONOSPHERE    Connected
on your screen...        
You may also see other stations that are working, 
so please be patient, and hopefully they will see your call, and as
you if you want to join in, or they may decide to qsy to another channel
 
When you have finished with cwcom,.. you should always click on the
world icon and "Disconnect"  before clicking on the X at the top right
of the screen to close down cwcom properly.
 
    Doing this, clears your call, from the "webview" of all users....
 
IF all that goes according to plan.... then you will be able to 
communicate using very old digital sending  equipment, as they did
on the original internet in the late 1800`s.. on the modern version of 
internet, today !... how about that for "progress"    ? ? 
 **************************************************************

 Landline Sounder users......


If you are intending to use a "Sounder" as on the old "landline/railway telegraph" you can make up an interface from the circuit diagram below


Please read the note below the schematic.....

and observe the "new" circuit layout  
 
The serial port provides output pins that can be connected to a Sounder (early Morse receive device) or used for an external flashing light. Here is the interface Circuit you can use: 

 This circuit was taken from the original help page on the CWCOM main window icons. (See the updated version below)

 
 Updated version.... 27 January 2019
 
Courtesy of Frank
 
As drawn the 1N4005 will not protect the 2N2222 keying transistor from the positive voltage spikes which appear at the collector whenever the transistor is turned off.


This situation is normally addressed by use of a "free-wheeling diode" as drawn on the attached amended schematic.  The free-wheeling diode as drawn limits the maximum collector voltage to the supply voltage plus one diode voltage drop (say Vsupply + 0.7V).


Be aware that there will be a very slight increase in the sounder / relay's release time however this is unlikely to be noticeable even at the blazing Morse speeds some are capable of and will certainly be less noticeable than a failed 2N2222.
 

revised circuit, showing differences  

WARNING... Be very careful connecting this circuit to your serial port or adapter
GND & RTS use different pin numbers, depending on whether it is 9 pin or 25 pin 

 
Enjoy your new program.. and Enjoy Morse !
Good Luck...  and   73`s   DE G3MS va dit dit     
 ******************************************************
 
 
 HERE IS A "TOUCH KEYER" CIRCUIT, 
AS PROVIDED BY GRANT/VK2GEL
 
Thank you, GRANT !. 
 
I have received an interesting email from Grant/VK2GEL in Australia.  He has designed a small PCB to accommodate a few components, and make a nice little tidy interface for Touch Keyers.

Here is his website page...  (click the linky 

http://members.westnet.com.au/page3/touch_keyer_interface.htm

Thank you Grant....


If anyone has any other useful ideas..... please email me... and I will see if they are appropriate to add to this page. (or a new page ! ).