Showing posts with label cw on line. Show all posts

Saturday 20 August 2016

Straight Morse Key - settings and adjustments and cleaning the contact point.

I have been asked, several times, to write a piece about how I set up my straight keys... and so here it is...

 A straight key, is a basic, ON / OFF switching device. used to transmit Morse Code using a Landline, or a Radio Transmitter, or a flashing light. 

 The principle behind the code is the length of the dashes and dots, and the relationship between the two ( long and short) period of time that the key is actually in the ON position.  A Dash, or "dah" is equivalent to 3 Dots, or "Dit" or "Di "as in the famous letter V used for testing the key... "Di Di Di Dah"... The space between letters in one word is equivalent to one dot... and the space between words is equivalent to one dash..

To send morse properly, requires some skill, and understanding of that relationship,  the more you use the Morse Key, the easier and more "fluent" the operator becomes, which increases his speed of sending. 

   However, it must be appreciated, that it is no good sending fast morse, if the guy at the other end, cannot receive it correctly , or understand it correctly, and at a speed that he is comfortable with receiving it....

 
.               ... also it is no good sending fast morse, and making lots of  mistakes,

.. this, in effect, slows down the actual words per minute count, due to error correction.

     Therefore, it is preferable to make good morse slowly and accurately...

   or , as I was told by my instructors in the Royal Navy... "Accuracy is more important than speed"... 

      That was true in 1960 and is still true today.

With that in mind, it should be obvious that the settings of the key should be understood, and so, I shall try to explain what to do, and what each function does, and how it will affect the morse being sent on that key.
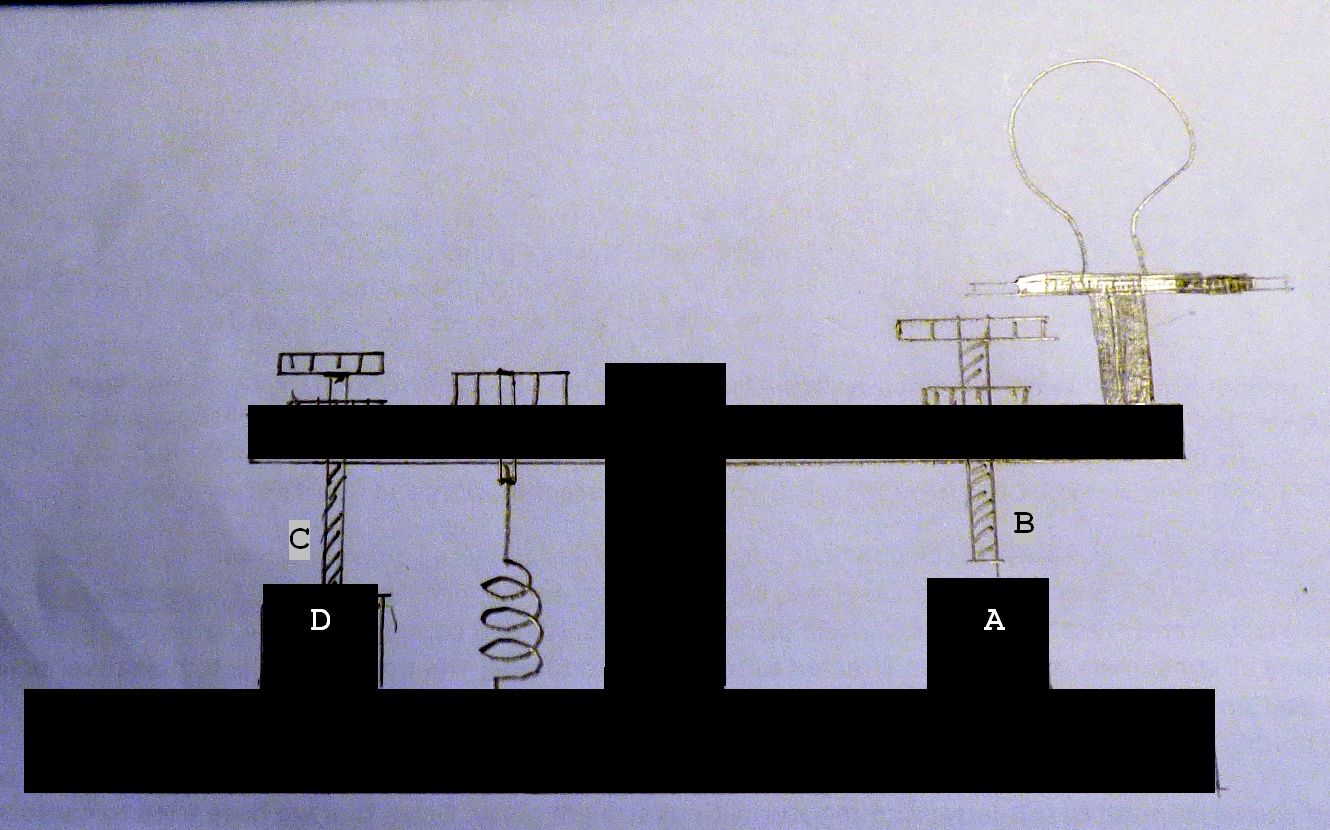
Here is a drawing of a straight key...  not all straight keys look like this, and indeed, some have different arrangements for the spring tension, and pivot point, but the basic information about the settings will become obvious, when compared to the key you are trying to set up, according to these instructions...


To make a start.... have a look at your key... and make sure that the rocker arm is roughly parallel to the base, or horizontal,... as in the drawing.   

Have a look at the contact points, by holding the key up to eye level, and against a light or window, you should be able to see how the surfaces of the contacts "mate" when the key is closed...

       If the rocker arm is tilted forward or backwards,.... only one edge of the Rocker Contact, will make contact with part of the base contact.... then the contact points will not close properly on a level surface, and cause key chirp, or incorrect, unwanted contact, so that is why it is important to start with the rocker arm "horizontal" as in the picture


Cleaning the contact point....


NEARLY ALL 2ND HAND STRAIGHT KEYS WILL HAVE BEEN ABUSED BY PREVIOUS USERS OVER THE YEARS... SO IT IS ESSENTIAL TO TRY TO REPAIR OR RESTORE YOUR "NEW" ( 2nd hand ) KEY .


  if your key is in "reasonable" condition, as outlined above, with the rocker arm level/horizontal, and the contact points in line...

The next thing to consider is cleaning and setting the actual (front)  (some keys have it at the rear)..contact points...   

Here you need to use some fine wet and dry paper, in a strip, to make the contact points clean. by just holding down the key and tightening the gap adjuster ( front or rear , depending on your key ). so that one thickness of the wet and dry paper is "just" gripped... draw the paper across the points and repeat about 3 or 4  times. ... , then turn the paper over, and do the same again...

This "should" make the contact surfaces "level" when the key is closed.... ... Check it against the light , as before, and continue until they are "true" 


After using the wet and dry paper... use a strip of ordinary white printing paper ( not glossy mag, or photo paper ), and draw that through the contact three or four times, to remove any surface grit or dust, which could cause unwanted contact.... 


BUT...if the rocker contact point and the base contact point are not "truly squared up".. this can cause keying problems.. so it is best to ascertain that the base contact point ( front and rear stop).. are "true" in the engineering sense of the word... 


 To do the work to "face up" the anvil (base) contact point, it will probably be necessary to take the key apart, being careful to lay out the parts and make notes of any special way it was put together....

Basically... the "anvil" point  (A) ... i.e. the one that is on the "base"... needs to be perfectly "faced up"..  so that the contact surface is "flat" and parallel in all directions across its surface...  

     On a straight key, it is possible to do this with a file, using some washers that act as the "working surface level".. i.e. put enough washers over it until just the "face" surface is just "proud"... then you can run a smooth file across until the surface is level... the washers act as a "stop" and a guide, to make sure the file is kept "level" to the base surface. 


     Once you have got the "anvil" point (A)  re-surfaced, it is easy to do the "hammer point"..  (B) . Using a strip of medium wet and dry paper. Read on !....

Re-assemble the key... with the rocker arm, springs and adjusters (contact) in place. 

 Set the rocker arm horizontal, and set the contact gap. 

 If the contacts are "fixed" and the gap is adjusted by a variable adjuster, and the gap between the contacts is too large for the rocker to be horizontal... then some "correction work" will be needed to make the contacts closer together... this may involve replacing the fixed contact on the rocker, or adding in some small washers, or alternatively raising the "anvil" (base) contact with some washers beneath it.

Once you have the remedial work done, and the rocker arm is horizontal again... you can "face up" the rocker ( hammer ) contact as follows...

using a strip  of medium wet and dry...  with the backing on the underside, i.e. rubbing against the surface of the anvil (base) contact while pressing the key down on to the wet and dry...

 draw the paper through, several times, until you get both surfaces to meet "face to face".. keep checking this by holding the key up against the light so you can see the "profile" of the contact surfaces....  check that the surfaces are "parallel" across the surfaces  side to side  and front to back.  

  if not... do some more work with the wet and dry.......  !.. it is well worth the effort to get this correct....

     After doing the filing and wet and dry... use a strip of "normal" white paper, to draw between the two points to clear away and working dust/filings...


       then adjust the gap according to your preference....  


    The rear "stop"   (D) and "gap adjuster" (C)  also needs to have the same treatment... otherwise the key will not "sit" properly at rest, between symbols, and that will cause some spurious dits, in just the same way as if the "anvil" and "hammer" are not "faced up"... 


      It may be a bit more difficult for a paddle key to be re-faced... but it is , none the less, just as relevant for the contacts to be clean, "mated" and "faced up"...to ensure good contact, especially if sending at high speed....


Doing the initial setting adjustments.

Once you have done the initial clean,...

slacken off all adjustments.... 

If your key has pivot points with a screw thread on the side ( as shown in the picture),... then you need to slacken them off too..

            Your key may not have side screw adjusters,.. but you still need to make sure that the rocker is free to move up and down...

          Use a drop of  light oil, or sewing machine oil, on all friction parts, where the pivot is making contact with the upright supports, to reduce operating friction.  

Test the rocker for fast reaction by tapping the key , and watching how quickly it returns to the horizontal "rest" position.

          If there is wear on your rocker pivots, you will probably have problems sending, even though you adjust the rest of the key properly, so you may want to consider how you can refurbish the worn rocker pivots, or replace the key with one that has no wear, or sideways  (horizontal) movement on the pivot point. 

 (Check it by holding the key steady and trying to move the knob from left to right.... )

Set the front and rear contacts (A & D )  to make the rocker arm horizontal again... 

    then tighten up the side adjustable pivot points until they "just" grip the rocker,

 making sure they have enough "grip" to prevent a sideways ( left to right ) movement of the rocker arm...but leaving a "free" movement up and down..   

 Any sideways movement here,(caused by wear and tear ) can alter the gap on the front contact by a hairs breadth, and cause incorrect keying. ..

           This adjustment is important.... and although it needs to hold the rocker arm steady, it must also allow "free movement" up and down on the rocker arm... 

If it is too tight, you will need to have more spring pressure or spring tension to return the rocker to the "off" position quickly enough for the key to work properly.

     Too tight, and it will also tire out your wrist action, and make keying uncomfortable or hard work,  after a short time. 

      Too slack, and it will move from side to side, as mentioned previously.

        To check the "free movement"... (up and down)

   slacken off the Gap adjuster ( front or rear depending on  your key)... so that it has a LARGE gap... and just test the movement of the rocker by quickly tapping the knob and watching to see how quickly it returns  ( you may need to add some spring pressure/tension, but don`t overdo it... "Just Enough" is the motto ... )


   A word about the springs on a straight key.....


Front springs, are usually PRESSURE  or COMPRESSION springs.. where you have to screw down  to adjust how much pressure is needed in the spring below, to force the key "off" and back to rest position.

Rear springs are usually TENSION springs, where you screw an adjuster "out" or "up" to increase the PULL DOWN on the rear half of the rocker arm, to pull the key "off" to the rest position.

      The amount of Tension or Pressure, that you have set on your key, will decide on how quickly the key returns to the "off" position, and also will decide the speed at which you can send...

      If you have a "strong" spring pressure or tension, it will bring the key off quicker, BUT, it will also slow down your sending, because you need more pressure in your wrist action to make the key "on"... and that will make your wrist tired quicker, and make more mistakes...

 and so, it is a "fine" line to adjust the spring properly for your sending style.

Setting the Gap.....

     The next thing to do is to set the gap.... Tear off a strip of paper from a normal A4 paper as used for printing out letters, etc...about 20 mm wide will suffice... and place it in the front contact gap, and then adjust the gap with the rear gap adjuster ( or front, if no rear one on your key ).. until it "just" nips the paper.... remove the paper and check the "free vertical movement" by tapping the key... checking to see how quickly it responds and returns to the "off" horizontal position.


  Spring adjustment...

            now is the time for you to adjust the spring tension, or spring pressure, 

 depending on which type B or type E you have on your key... ...  You can also adjust the gap to a smaller amount, to reduce noise, and to increase the speed you can send at. 

         Practice sending some words ( not connected to your transmitter).. to see how the key "feels"...  and adjust the spring tension/pressure and gap,  according to your way of sending.

 And that`s about it..  ... from this "initial setup" you should be able to make "fine adjustments" of the gap and tension/pressure, to suit your style of sending...

Once you have adjusted the spring tension/pressure, and set the gap, even small adjustments on the size of the gap, can alter the timing of your sending symbols, and subsequently, the speed that you can send at...

       As a really bad example of this.... If you set your gap at ( say ) 5 mm  and you sent some symbols, it would be ( say ) 10 wpm maximum because of the actual distance the rocker ( and contact closing time ) arm has to travel...
.
            now if you reduced the gap to ( say ) 2.5mm... and sent the same symbols it would ( probably) increase the maximum speed to ( say ) 15 wpm.... and so on...
                the smaller the gap, the less time the rocker takes to close and open during your sending of symbols, and consequently, the smaller the gap, the quicker you are able to send...

   This does not mean, that by setting the gap very fine, you WILL send faster, because, of course, it depends on your skill and training levels. You can still send slowly with a small gap though ! ! !... 


You can practice sending, using this, and other "standard" test phrases...

BROWN BREAD TASTES BEST WITH BUTTER AND STRAWBERRY JAM 

THE QUICK BROWN FOX JUMPS OVER THE LAZY DOGS BACK

NOW IS THE TIME FOR ALL GOOD MEN TO COME TO THEIR MORSE KEYS 

this one is a really good test .....!

OF ALL THE FISHES IN THE SEA THE MERMAID IS THE ONE FOR ME 
 

Whilst "practicing" you should be trying to analyse what "feels" right... and what "feels" wrong with the key......

Remember... Accuracy is more important than speed..... and try not to send faster than the other guy can receive accurately.... !

I hope it has helped you to set, and get the best, of your straight key

The video below, shows me using an Admiralty Pattern 7681 Straight key, adjusted according to the instructions above.... as you can see, I do not use the key in a conventional "Hold"  I just tap on the spark guard.... I got my knuckles rapped with a ruler, quite a lot, when I was in training,... but eventually, the instructors decided I could send better "my" way... than the "official" way ! ! !

 You can view the video on FULL SCREEN by clicking the square in the bottom corner.... Put your phones on,.... or turn up the volume...


I do not have a ham licence, but you can find me on CWCOM, using my keys ( as featured in my other  blog    http://nemosphotography.blogspot.co.uk/       ) contacting people around the world, using the ancient, morse code, over the modern internet...  
 CWCOM is free to use and download from  


https://archive.org/details/cwcom
 
( see page 1 of this blog for details ) . 

Hope to see you there, my call is G3MS       73  VA dit dit

Tuesday 9 August 2016

CWCOM - Working Procedures

CWCOM is an easy to use program,  although there are no "rules & regulations" stipulated, a common sense approach to "working procedures" works reasonably well.

In general, the procedure followed by existing operators, is very similar to that of Amateur Radio operations,..  using the same Q codes and "overs" system....  however, a few points need to be explained to make things work smoothly "on channel".

Unlike the HF radio frequencies. there is no fading, (QSB)... there is no low power section ( QRP ). and the only mode of operation is CW or Morse. with a modification that you can also TYPE your QSO, which is then sent across the internet in Morse to the receiving station. Because of this, it is pointless sending some kind of signal report,... such as  599 or 5nn... everything on cwcom is 100 percent 599 due to the nature of the internet.. !

Channel 1000 is the Primary or DEFAULT channel,.. and can be considered as the CALLING FREQUENCY.... (but can be used for chat if no other stations are showing on the "on channel" window)  once a QSO has been started, it is "common sense" to QSY or "shift"to another channel,... Especially if there are other stations showing on the "on channel" window....this is easily done.. no re-tuning of antenna !... just announce the new channel..."QSY 999" or whatever channel you want... the other station will probably agree,.. and you can both  send   Dit Dit,..or "UP"... and then click on the up or down arrow on the channel window at the bottom of the text screen... 


How to QSY on cwcom ?   


the channel number at the bottom of the screen is the channel "in use"... to qsy use the "up" or "down" arrows to the right of the number and that will qsy you.... the other station will have to do the same... ! .

This will then leave the "Default" or calling channel free for newer stations to be able to establish their own qso.

Using the "WebView" icon   this gives a new page called IONOSPHERE Current users list of channels .  ((The "monitor screen icon" at the top of the text screen)), you can find out what channels other stations are working on.

In the past few years, channel 1000 has become the "general chat channel".. because there has not been many users... and it seemed to be a bit pointless to QSY,.. in other words, it has become "habit" to continue qso`s... The  problem with this, is,    that if a number of other stations start CWCOM they will also, by default, be on channel 1000, and because a QSO is in progress, will, "hopefully" politely wait for  ........

A... the qso to end...
B... to be called into the qso...
C... try to "break in", causing a "collision".. and upsetting the QSO in progress. .

D... Give up and leave. 


It is therefore a good idea to re-size the main screen, so that the "On Channel" window, can be positioned below the main screen.. and when new user start up...they will be shown on that screen, and hopefully, those in the QSO, will call them, or arrange a QSY  to free up 1000 again.


CLICK ON THE PIC .... FOR A LARGER VIEW


Sometimes... a "collision" is unintentional, due to new users not knowing how cwcom actually works,.. other times it is deliberate, due to frustration of waiting, and being ignored.   

If everyone uses the "On Channel" window as described above, then it is possible to pass a message to other stations using the "message box" at the top of the screen, to the right of the QRX box.

 
Messages here, are displayed alongside the callsign on the "On Channel" window... therefore, it would be possible to ask another station ( not involved in the existing QSO) to QSY to 1001 and start a new QSO, without interrupting the existing one...

 e.g.  G4ABC wants to chat to YZ2ABC, but there is a QSO already running on 1000... G4ABC will put    YZ2ABC QSY 1001 K on the message box...    YZ2ABC sees the message, and responds in his message box   UP.. or SEE YOU THERE. or some acknowledgement.. then both stations move to 1001...   

NOTE>.. To remove messages ... delete by backspacing, or highlighting and backspace, then press SPACE BAR and then RETURN key... this.. in effect . puts  a  new message       ( the space ) on the message box.

A word about typing.... Some stations have removed all the CAPITAL LETTERS from their Morse Library ( tutorial  Editing the morse library... Page 15 of this blog )..  this means that whatever is typed in capital letters, does not have the morse sound when received.   Also.. when you type.. ( as an "over" )  you will not hear the sound of your typing in morse code.

As is common practice, it is "good manners" to use "lower case" when typing, as this is "not shouting".. although it is only an advisory matter. Some Australian  Post Office Telegraphists of the Landline era, still like to see the text in Upper Case, as that is what they used on their typewriters.

Also when typing... you should still follow the conventions of the HF Amateur Radio operations, and "be nice to each other"  ! ! !

 most importantly... end your "typed over" with the letter K or AR as you would if sending morse.. to let the distant station know you have finished typing.!!


Enjoy yourself,  73`s   Dit Dit ! ! .


G
M
T
Y
Text-to-speech function is limited to 200 characters

Monday 8 August 2016

CWCOM - Configurations & Settings instructions


 you should do before starting to use the prog  

 This is most important to do, early on, as it guides you through some pages of settings that make cwcom work properly for you,.


To start... open CWCOM. by clicking the icon on your desktop.  

        you will be presented with the "text screen" 


The Following is a list of Settings & Configurations, that should be done on the FIRST RUN of cwcom.


Note.. If you run VMware or are trying to run cwcom inside a virtual box... it will not connect properly... In the case of VirtualBox.. there will be a significant keying/sound/decode delay, due to double processing of the signals.

In the case of VM ware.. you should disable it/them.  In windows it is  Control Panel > Network Connections. Once disabled, the program should show your correct IP address on the Connect Window and you should also appear on the IONOSPHERE site, once you are connected.

First run Settings...

Click on the  "Configurations" icon... the one to the right of the Black Letter A

Configurations window appears.....

( this is the first thing to click on, when starting CWCOM,  after you have done these settings, to initiate the "comport"  if you are using an external key)... see note below....


CWCOM CONFIGURATION WINDOW
___________________________________________

click on the Morse tab.....
Untick  "Flashing Light" on Transmit
Untick  "Flashing Light" on Receive

Adjust the slider on "Incoming Morse Speed" to 70%
( This reduces "Buffering" on computer of incoming signals, and removes a long delay between overs)

Adjust the "Incoming Morse Tone" to about 820 ( you can change this later on if you want) 
(This is a lower tone than default high pitch, which is much easier on the ears - and reduces"clipping" )

Note.....
You can find the COMPORT number, in Windows, in,
  Control Panel> 
                 Device manager >
                                Ports Com & LPT 
       ( click on the > triangle  to see the comport number)

     Your comport number will remain "selected" for the next time you start cwcom.

 BUT 

you will need to click on the Config icon,  to select "COM Port" every time you start cwcom. If using an external key.


   LINUX AND MAC users see special pages for instructions on setting the comport number .
___________________________________________________________________________________

Click on the Translation tab....

Tick ( checkmark)  Translate Text Only ( so three ticks in three boxes on that section)

Adjust the speed to around 20 wpm.

(this may seem fast... but... it speeds up the reception and decoding of typed messages from distant stations) .
      (also your ears will become accustomed to the speed, and it will help you to read faster morse by watching the screen at the same time ! ! ! )

___________________________________________________________________________________

Click on the "Morse Key" tab....
      * you will need to click on this one, first, every time you start cwcom to select the "comport" if you are using an external key *

If you are using the down arrow key... the Keyboard is the default setting, but you need to click the mouse cursor on the screen for it to be effective.

If you are using an external key... checkmark the morse key section

 Iambic for paddle 

 Manual for straight key (vertical key)

For Iambic key... select "Looping Method"

For Straight key.... select "Reset Method"

If you want to use an external key... 
you need to read the instructions on page.5.... Connecting a Morse Key


______________________________________________________________________________

Click on the Transmit tab.....
Adjust the WPM to something near to your estimated speed.

For Down Arrow... set about 10 wpm.

For Paddle Key ... set to your estimated speed... but do not apply the "lock"

For Straight Key..set to your estimated speed...

For all types of key.... do a short test transmission...  I suggest 

 
 BROWN BREAD TASTES BEST WITH BUTTER AND STRAWBERRY JAM.... 

KEEP GOING.  DO NOT CORRECT ERRORS. the computer needs to read the timing of your sending to adjust the decode speed.

Iambic key users... do not lock the result...but keep a note of the settings for future reference.

Straight key users... when you have a good copy on screen, you can "lock" the speed.
You may need to restart cwcom for this to take effect.

You can also do this "off line" before connecting to the server on the "world icon"

Click on CLOSE

___________________________________________________________________________________


Morse Mail is not used...

___________________________________________________________________________________

Click on the Speaker Icon and adjust the TX Pitch to about 820  ( lower tone than default high pitch and easier on the ears! )

___________________________________________________________________________________

Click on the World icon....   to start using cwcom... BUT>>>  do this first, for the first time only ! !

IMPORTANT......

Check the "Address" on the Remote Details 

the Address box should read ......[ morsecode.dyndns.org ]

 
          MAKE SURE THAT YOU USE THE CORRECT "Remote Details" address.

 on the "Connect" window ... 
               
not   [mrx.ham-radio-op.net


You can now enter your callsign, or nick name,  in the "Call Sign" box... and it will show when you are "on channel" and on the Ionosphere current user list. 

If you do not have a ham callsign, you can use your first name, or a "psuedonym", which will identify you "on channel" in the same way. 

NOW>... you are ready to communicate !  world wide.... using the old skill of Morse Telegraphy, as used on the ORIGINAL INTERNET in the late 1880 ` s  ! ! .


 ******************************************************


To get started.

Click the desktop Icon to open CWCOM

Click the "configuration" icon  between the black letter A and the Spkr icon

Choose your "morse key"... default is Keyboard... you can type as normal, or you can use the Down Arrow as a straight key

(note.. when typing, you will not hear morse, but the receive station will) 

REMEMBER TO END YOUR TYPING WITH A K AS NORMAL QSO PROCEDURE, SO THE REMOTE STATION KNOWS WHEN TO ANSWER.

(choose Comport and the number selected if you are using a USB to Serial Converter or the Serial Port  to connect your external key to the laptop/computer)

See page 5 ...

Close the "configuration" window by the X

(optional - next click the black letter A and choose your font and font size - this only affects your screen, not the distant screens)

Click the third icon from the black square... this is the IONOSPHERE that shows the active channels, and any stations on them 

(Minimise this and park it somewhere - see Page 9 of the blog  https://morsepower.blogspot.com/2017/04/suggested-computer-screen-layout-for.html )

Click the "blue world" icon next to the black square... this is the "connect" window .

You can put your callsign in the "callsign box".. and it will be showing on the IONOSPHERE and also when you start transmitting .

Click the "Connect" box, and you will be connected to the IONOSPHERE server, and be able to qso with others on channel.

Click the "Disconnect" box when finished using cwcom before closing with the X


NOTE.....
     If you are using a paddle key,.. you need to change from Manual, (default) to Iambic.  and if your morse comes out as a series of TTTT TT TTTT TTT T TTT T TTT , then you need to check your "Transmit" tab and the speed settings or to change from the default "Looping Method" to the Reset Method


Any Problems.... send me a detailed email 


and I will get back to you with an answer  ( hopefully ! ! !)...

G
M
T
Y
Text-to-speech function is limited to 200 characters

Saturday 6 August 2016

CWCOM - Getting Started - What do those Icons stand for.... ?

CWCOM will work, without any configurations !.. Almost true !.

Once you have installed CWCOM, and you have managed to get your key connected, ( or just can`t wait, and have to use the Down Arrow Key). you will need to "open" the program, by clicking on the desktop icon... 

You will be presented with the Main Screen, and across the top of the screen is a series of icons.. from left to right... a quick description follows below these start up instructions. .


To start using cwcom with no changes to setting/configurations, 


1.   Click the "equaliser" icon  ( to the right of the black A)  and then Select the "Morse Key" that you want to use... Keyboard..... COM Port or  Mouse. 

( COM Port is for when you have connected your key via an interface such as the USB to Serial Converter PL2303) 

  This is the first thing you need to select EVERY TIME you start cwcom 

 2.  Select Iambic if using Mouse otherwise Manual is default

3. Select Reset Method ( this will remain selected for next time onwards)  

4. Click "Close" 


5.  You can now select the Blue World Icon ( Connect ) icon on the top of the screen. 

6.  Enter your callsign, or nick name in the Callsign box where your I.P. address is.

This will remain saved for next and future use.


7.  Click the "Connect" button to connect to the remote server..... and away you go !.


CWCOM MAIN SCREEN FULL SIZE


TOP OF MAIN SCREEN SHOWING ICONS AND MESSAGE BOX

Below, is a description of what those Icons stand for....


Black Square.... this is where you will get a "flashing light" effect, and also the place you need to put and keep, your mouse cursor, if you want to use the mouse as a key.
(You can disable this in the configuration settings on page  4  of this blog) 

Blue World...... this is the "connect" icon... YOU MUST CLICK THIS AFTER CLICKING THE CONFIGURATION ICON, on starting cwcom. 
  
                 click it and you get a pop out screen.

     On here, you can adjust the Channel number with the up and down arrow, and you can enter your Callsign, or name, or whatever Identity you like. which will show when you connect.


  You will need to click the "CONNECT" box every time you start cwcom...

and don`t forget to "Disconnect" before eXiting the program after you have finished.


THE "CONNECT" WINDOW

IMPORTANT EDIT ... 
         If you are using version 1.47 from Softpedia download. MAKE SURE THAT YOU USE THE CORRECT  "Remote Details" on the "Connect" window ... 

the Address box should read ...... 

                        [ morsecode.dyndns.org ] 

                                not   [mrx.ham-radio-op.net


Horseshoe of monitors.... this gives a pop-out screen showing who is "on channel"


Note to tablet or small screen users,... and Windows 10 users..


       If you cannot see this small window "On Channel" , you may need to "shift" the lower task bar..... to do this.. find a clear space on it, about the middle, then left click, hold and drag, to the right or left edge of your screen....  

     If you still cannot see the "on channel" window, you may notice a thin white line at the bottom edge of your computer screen... use the "drag and drop" technique to bring it into the middle of the screen,  resize it, and place it somewhere convenient, but not in the main window.... and then replace the task bar in the reverse movement.... 


Windows 10 users....USE COMPATIBLE MODE...

 you may still not see this,... however, if you now use "Compatible Mode"...  and change it to Windows Vista, 7, or 8.... then you should be able to see the white line as mentioned above.


To use Compatible mode.... 


START  > type in  CWCOM in the box above Start....  or find the cwcom exe

  Right click on the CWCOM icon, and find " Open File Location"... in the drop down menu.

 Left click on that...  Then Right click on the  CWCOM icon again.. click on Properties,

. to find "Compatibility" tab...  ..   Then  check the box at "run this program in compatibility mode for....."   click on the arrow to get the drop down list....
of previous Windows O.S.  and I suggest you use Windows 7 or Windows Vista as compatible modes.... and I hope that works for you....  Good Luck... ).


"ON CHANNEL" WINDOW   SHOWING TWO STATIONS ON CHANNEL 1000 (DEFAULT CHANNEL)


Single monitor ..or ....  (WEB VIEW) . this shows the whole spectrum of channels in use ( on a separate web page) , and the callsigns/names of people on them ... (not always accurate/up to date - bugs on this bit) (as you can see there is a duplicate of GEMS callsign)


"WEBVIEW" OF ALL CHANNELS AND CALLSIGNS (not always accurate).


Suggested computer screen layout, when operating cwcom

See also Page 9on this blog


It is a good idea to RE-SIZE the MAIN WINDOW on your screen, so that you can have the "ON CHANNEL" window in a small space below the main window, to keep an eye on who is joining/waiting/leaving the channel  ( and also my QRZ listing - separate tutorial on how to make )


File Folder.... this gives access to your own documents folder, so you can use documents to send to distant stations...  ( NOTE.. I have not used this system, so cannot give any guidance on how to use it, or how it is supposed to work)

Printer... self evident.. gives access to your printer. to print out the contents of the screen. (never used this facility)

A ... this gives access to your FONT folder, and you can change the font on the screen to one that you prefer. ( you can add new fonts to your own FONT FOLDER ( on your computer only - does not affect "remote" stations fonts )  and they will appear also)
.
"equaliser".. this is the CONFIG or CONFIGURATION icon...

This is a very important icon to click.    
 YOU MUST CLICK THIS ICON each time you start CWCOM.- - - - -    See Page 4 - Configuration  on the nav bar at top of page. 

Speaker....   here you can adjust the tone of the morse,  ( suggest you try about 820 to 850 for better sound ( lower tone ). quality of keying....
and also the RX SPEED.. it is set at 100% default, but needs to be changed to 70% to be more like Live HF communication.  (explain later )
 
Question Mark.... this is the HELP File.. and you should read through it, to make yourself comfortable with all the aspects of cwcom provided by the author. 

A with paint brush.... this is the  " Morse Library" folder access... where you can change the prosigns and other things, that appear on your screen... A tutorial about this will be published later. ( See Page 12.. Editing the Morse Library)


QRV ... this means   I am ready to receive... and is "on"(pressed) by Default, and also as soon as you send any morse.

QRL...  this means... I am busy.. but I am still watching/listening
        you set this when you have other things to do, and don`t want to be called to answer ....  e.g.  Phone call... Door ... meal time... etc

QRX... this means   I am away..... from the computer.. I will not answer.... you set this... . but you will still see the text that appeared while you were away..

The long window, ( Message Box) .. next to QRX.. here you can put a short message that will be seen on the "on channel" window next to your name/callsign   messages such as   GEMS  QSY 999 K  when the channel is busy with other people, and you don`t want to break into their conversation.

  to remove a message,  just delete it.... press the space bar... and then the return key.

At the bottom of the screen, you will see a red bar moving in time with the morse. or typing.. this is the "buffer" and will decrease as the buffer empties..  you will also see the "active channel" you are on... and you can also change the your "active channel" ( when doing a QSY ) using the up/down arrows...

You will see a box with  [1000] and black triangle "up" and "down"   you can use this to change the channel number  ( frequency ) for quick QSY when needed. 


Stop... this will stop any lengthy typing from appearing on screen, and also stop the morse sound.

Clear... this does just that... it clears the screen .

The red and green buttons are just to show transmit and receive..
the black oblong to the right will show "Collision" in yellow, when two stations transmit at the same time. (or other colours ! )

So .. that explains the Main Screen..    Next I will give advice on doing the whole CONFIGURATION settings.   ( see page 4. Configuration settings)