Showing posts with label cw chat. Show all posts

Monday 8 August 2016

CWCOM - Configurations & Settings instructions


 you should do before starting to use the prog  

 This is most important to do, early on, as it guides you through some pages of settings that make cwcom work properly for you,.


To start... open CWCOM. by clicking the icon on your desktop.  

        you will be presented with the "text screen" 


The Following is a list of Settings & Configurations, that should be done on the FIRST RUN of cwcom.


Note.. If you run VMware or are trying to run cwcom inside a virtual box... it will not connect properly... In the case of VirtualBox.. there will be a significant keying/sound/decode delay, due to double processing of the signals.

In the case of VM ware.. you should disable it/them.  In windows it is  Control Panel > Network Connections. Once disabled, the program should show your correct IP address on the Connect Window and you should also appear on the IONOSPHERE site, once you are connected.

First run Settings...

Click on the  "Configurations" icon... the one to the right of the Black Letter A

Configurations window appears.....

( this is the first thing to click on, when starting CWCOM,  after you have done these settings, to initiate the "comport"  if you are using an external key)... see note below....


CWCOM CONFIGURATION WINDOW
___________________________________________

click on the Morse tab.....
Untick  "Flashing Light" on Transmit
Untick  "Flashing Light" on Receive

Adjust the slider on "Incoming Morse Speed" to 70%
( This reduces "Buffering" on computer of incoming signals, and removes a long delay between overs)

Adjust the "Incoming Morse Tone" to about 820 ( you can change this later on if you want) 
(This is a lower tone than default high pitch, which is much easier on the ears - and reduces"clipping" )

Note.....
You can find the COMPORT number, in Windows, in,
  Control Panel> 
                 Device manager >
                                Ports Com & LPT 
       ( click on the > triangle  to see the comport number)

     Your comport number will remain "selected" for the next time you start cwcom.

 BUT 

you will need to click on the Config icon,  to select "COM Port" every time you start cwcom. If using an external key.


   LINUX AND MAC users see special pages for instructions on setting the comport number .
___________________________________________________________________________________

Click on the Translation tab....

Tick ( checkmark)  Translate Text Only ( so three ticks in three boxes on that section)

Adjust the speed to around 20 wpm.

(this may seem fast... but... it speeds up the reception and decoding of typed messages from distant stations) .
      (also your ears will become accustomed to the speed, and it will help you to read faster morse by watching the screen at the same time ! ! ! )

___________________________________________________________________________________

Click on the "Morse Key" tab....
      * you will need to click on this one, first, every time you start cwcom to select the "comport" if you are using an external key *

If you are using the down arrow key... the Keyboard is the default setting, but you need to click the mouse cursor on the screen for it to be effective.

If you are using an external key... checkmark the morse key section

 Iambic for paddle 

 Manual for straight key (vertical key)

For Iambic key... select "Looping Method"

For Straight key.... select "Reset Method"

If you want to use an external key... 
you need to read the instructions on page.5.... Connecting a Morse Key


______________________________________________________________________________

Click on the Transmit tab.....
Adjust the WPM to something near to your estimated speed.

For Down Arrow... set about 10 wpm.

For Paddle Key ... set to your estimated speed... but do not apply the "lock"

For Straight Key..set to your estimated speed...

For all types of key.... do a short test transmission...  I suggest 

 
 BROWN BREAD TASTES BEST WITH BUTTER AND STRAWBERRY JAM.... 

KEEP GOING.  DO NOT CORRECT ERRORS. the computer needs to read the timing of your sending to adjust the decode speed.

Iambic key users... do not lock the result...but keep a note of the settings for future reference.

Straight key users... when you have a good copy on screen, you can "lock" the speed.
You may need to restart cwcom for this to take effect.

You can also do this "off line" before connecting to the server on the "world icon"

Click on CLOSE

___________________________________________________________________________________


Morse Mail is not used...

___________________________________________________________________________________

Click on the Speaker Icon and adjust the TX Pitch to about 820  ( lower tone than default high pitch and easier on the ears! )

___________________________________________________________________________________

Click on the World icon....   to start using cwcom... BUT>>>  do this first, for the first time only ! !

IMPORTANT......

Check the "Address" on the Remote Details 

the Address box should read ......[ morsecode.dyndns.org ]

 
          MAKE SURE THAT YOU USE THE CORRECT "Remote Details" address.

 on the "Connect" window ... 
               
not   [mrx.ham-radio-op.net


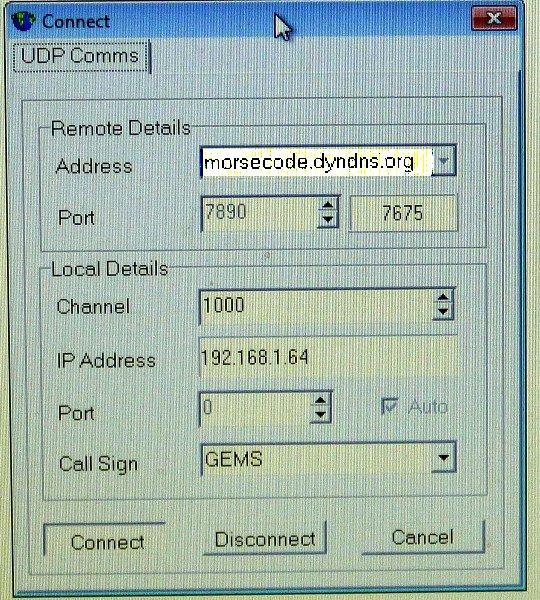
You can now enter your callsign, or nick name,  in the "Call Sign" box... and it will show when you are "on channel" and on the Ionosphere current user list. 

If you do not have a ham callsign, you can use your first name, or a "psuedonym", which will identify you "on channel" in the same way. 

NOW>... you are ready to communicate !  world wide.... using the old skill of Morse Telegraphy, as used on the ORIGINAL INTERNET in the late 1880 ` s  ! ! .


 ******************************************************


To get started.

Click the desktop Icon to open CWCOM

Click the "configuration" icon  between the black letter A and the Spkr icon

Choose your "morse key"... default is Keyboard... you can type as normal, or you can use the Down Arrow as a straight key

(note.. when typing, you will not hear morse, but the receive station will) 

REMEMBER TO END YOUR TYPING WITH A K AS NORMAL QSO PROCEDURE, SO THE REMOTE STATION KNOWS WHEN TO ANSWER.

(choose Comport and the number selected if you are using a USB to Serial Converter or the Serial Port  to connect your external key to the laptop/computer)

See page 5 ...

Close the "configuration" window by the X

(optional - next click the black letter A and choose your font and font size - this only affects your screen, not the distant screens)

Click the third icon from the black square... this is the IONOSPHERE that shows the active channels, and any stations on them 

(Minimise this and park it somewhere - see Page 9 of the blog  https://morsepower.blogspot.com/2017/04/suggested-computer-screen-layout-for.html )

Click the "blue world" icon next to the black square... this is the "connect" window .

You can put your callsign in the "callsign box".. and it will be showing on the IONOSPHERE and also when you start transmitting .

Click the "Connect" box, and you will be connected to the IONOSPHERE server, and be able to qso with others on channel.

Click the "Disconnect" box when finished using cwcom before closing with the X


NOTE.....
     If you are using a paddle key,.. you need to change from Manual, (default) to Iambic.  and if your morse comes out as a series of TTTT TT TTTT TTT T TTT T TTT , then you need to check your "Transmit" tab and the speed settings or to change from the default "Looping Method" to the Reset Method


Any Problems.... send me a detailed email 


and I will get back to you with an answer  ( hopefully ! ! !)...

G
M
T
Y
Text-to-speech function is limited to 200 characters

Saturday 6 August 2016

CWCOM - Getting Started - What do those Icons stand for.... ?

CWCOM will work, without any configurations !.. Almost true !.

Once you have installed CWCOM, and you have managed to get your key connected, ( or just can`t wait, and have to use the Down Arrow Key). you will need to "open" the program, by clicking on the desktop icon... 

You will be presented with the Main Screen, and across the top of the screen is a series of icons.. from left to right... a quick description follows below these start up instructions. .


To start using cwcom with no changes to setting/configurations, 


1.   Click the "equaliser" icon  ( to the right of the black A)  and then Select the "Morse Key" that you want to use... Keyboard..... COM Port or  Mouse. 

( COM Port is for when you have connected your key via an interface such as the USB to Serial Converter PL2303) 

  This is the first thing you need to select EVERY TIME you start cwcom 

 2.  Select Iambic if using Mouse otherwise Manual is default

3. Select Reset Method ( this will remain selected for next time onwards)  

4. Click "Close" 


5.  You can now select the Blue World Icon ( Connect ) icon on the top of the screen. 

6.  Enter your callsign, or nick name in the Callsign box where your I.P. address is.

This will remain saved for next and future use.


7.  Click the "Connect" button to connect to the remote server..... and away you go !.


CWCOM MAIN SCREEN FULL SIZE


TOP OF MAIN SCREEN SHOWING ICONS AND MESSAGE BOX

Below, is a description of what those Icons stand for....


Black Square.... this is where you will get a "flashing light" effect, and also the place you need to put and keep, your mouse cursor, if you want to use the mouse as a key.
(You can disable this in the configuration settings on page  4  of this blog) 

Blue World...... this is the "connect" icon... YOU MUST CLICK THIS AFTER CLICKING THE CONFIGURATION ICON, on starting cwcom. 
  
                 click it and you get a pop out screen.

     On here, you can adjust the Channel number with the up and down arrow, and you can enter your Callsign, or name, or whatever Identity you like. which will show when you connect.


  You will need to click the "CONNECT" box every time you start cwcom...

and don`t forget to "Disconnect" before eXiting the program after you have finished.


THE "CONNECT" WINDOW

IMPORTANT EDIT ... 
         If you are using version 1.47 from Softpedia download. MAKE SURE THAT YOU USE THE CORRECT  "Remote Details" on the "Connect" window ... 

the Address box should read ...... 

                        [ morsecode.dyndns.org ] 

                                not   [mrx.ham-radio-op.net


Horseshoe of monitors.... this gives a pop-out screen showing who is "on channel"


Note to tablet or small screen users,... and Windows 10 users..


       If you cannot see this small window "On Channel" , you may need to "shift" the lower task bar..... to do this.. find a clear space on it, about the middle, then left click, hold and drag, to the right or left edge of your screen....  

     If you still cannot see the "on channel" window, you may notice a thin white line at the bottom edge of your computer screen... use the "drag and drop" technique to bring it into the middle of the screen,  resize it, and place it somewhere convenient, but not in the main window.... and then replace the task bar in the reverse movement.... 


Windows 10 users....USE COMPATIBLE MODE...

 you may still not see this,... however, if you now use "Compatible Mode"...  and change it to Windows Vista, 7, or 8.... then you should be able to see the white line as mentioned above.


To use Compatible mode.... 


START  > type in  CWCOM in the box above Start....  or find the cwcom exe

  Right click on the CWCOM icon, and find " Open File Location"... in the drop down menu.

 Left click on that...  Then Right click on the  CWCOM icon again.. click on Properties,

. to find "Compatibility" tab...  ..   Then  check the box at "run this program in compatibility mode for....."   click on the arrow to get the drop down list....
of previous Windows O.S.  and I suggest you use Windows 7 or Windows Vista as compatible modes.... and I hope that works for you....  Good Luck... ).


"ON CHANNEL" WINDOW   SHOWING TWO STATIONS ON CHANNEL 1000 (DEFAULT CHANNEL)


Single monitor ..or ....  (WEB VIEW) . this shows the whole spectrum of channels in use ( on a separate web page) , and the callsigns/names of people on them ... (not always accurate/up to date - bugs on this bit) (as you can see there is a duplicate of GEMS callsign)


"WEBVIEW" OF ALL CHANNELS AND CALLSIGNS (not always accurate).


Suggested computer screen layout, when operating cwcom

See also Page 9on this blog


It is a good idea to RE-SIZE the MAIN WINDOW on your screen, so that you can have the "ON CHANNEL" window in a small space below the main window, to keep an eye on who is joining/waiting/leaving the channel  ( and also my QRZ listing - separate tutorial on how to make )


File Folder.... this gives access to your own documents folder, so you can use documents to send to distant stations...  ( NOTE.. I have not used this system, so cannot give any guidance on how to use it, or how it is supposed to work)

Printer... self evident.. gives access to your printer. to print out the contents of the screen. (never used this facility)

A ... this gives access to your FONT folder, and you can change the font on the screen to one that you prefer. ( you can add new fonts to your own FONT FOLDER ( on your computer only - does not affect "remote" stations fonts )  and they will appear also)
.
"equaliser".. this is the CONFIG or CONFIGURATION icon...

This is a very important icon to click.    
 YOU MUST CLICK THIS ICON each time you start CWCOM.- - - - -    See Page 4 - Configuration  on the nav bar at top of page. 

Speaker....   here you can adjust the tone of the morse,  ( suggest you try about 820 to 850 for better sound ( lower tone ). quality of keying....
and also the RX SPEED.. it is set at 100% default, but needs to be changed to 70% to be more like Live HF communication.  (explain later )
 
Question Mark.... this is the HELP File.. and you should read through it, to make yourself comfortable with all the aspects of cwcom provided by the author. 

A with paint brush.... this is the  " Morse Library" folder access... where you can change the prosigns and other things, that appear on your screen... A tutorial about this will be published later. ( See Page 12.. Editing the Morse Library)


QRV ... this means   I am ready to receive... and is "on"(pressed) by Default, and also as soon as you send any morse.

QRL...  this means... I am busy.. but I am still watching/listening
        you set this when you have other things to do, and don`t want to be called to answer ....  e.g.  Phone call... Door ... meal time... etc

QRX... this means   I am away..... from the computer.. I will not answer.... you set this... . but you will still see the text that appeared while you were away..

The long window, ( Message Box) .. next to QRX.. here you can put a short message that will be seen on the "on channel" window next to your name/callsign   messages such as   GEMS  QSY 999 K  when the channel is busy with other people, and you don`t want to break into their conversation.

  to remove a message,  just delete it.... press the space bar... and then the return key.

At the bottom of the screen, you will see a red bar moving in time with the morse. or typing.. this is the "buffer" and will decrease as the buffer empties..  you will also see the "active channel" you are on... and you can also change the your "active channel" ( when doing a QSY ) using the up/down arrows...

You will see a box with  [1000] and black triangle "up" and "down"   you can use this to change the channel number  ( frequency ) for quick QSY when needed. 


Stop... this will stop any lengthy typing from appearing on screen, and also stop the morse sound.

Clear... this does just that... it clears the screen .

The red and green buttons are just to show transmit and receive..
the black oblong to the right will show "Collision" in yellow, when two stations transmit at the same time. (or other colours ! )

So .. that explains the Main Screen..    Next I will give advice on doing the whole CONFIGURATION settings.   ( see page 4. Configuration settings)